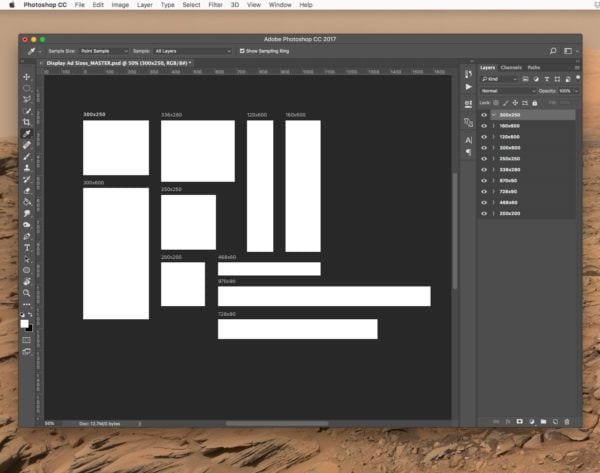
As a designer, I’ve built a lot of display ads. For a long time, I had to create separate documents for each ad size within Photoshop, but the creation of artboards in Photoshop changed how we did things. Now we use one document with 10 art boards to create AdWords image ads easier and quicker than ever.
To download the template, click here.
I’m going to walk you step by step through using this master template so you can quickly create multiple sizes of the same ad for better eligibility across the display network.
Step 1: Open the template
Once you’ve downloaded the PSD template, you’ll be able to open it in Photoshop. It should look like this:
Each ad size is its own artboard that is labeled with its dimensions, so you’ll be able to navigate easily between them or just create the sizes you want.
Step 2: Build your first ad
I like to start with 300 x 250 as it’s one of the most middle ground of the sizes. Once you add all your text and elements, your document will look like this: 
You’ll also see that all the elements of the ad appear in the layers tab to the right underneath the correct art board.
Step 3: Copy the ad elements to another size
Select all the elements within the ad. You can either do this by dragging a selection bounding box, or selecting all of the layers on the side tab.

Then, hold down Alt (Windows) or Option (Mac OS) and drag those elements to the next artboard.

This will create a copy of all the elements.
Step 4: Resize the elements to fit in the artboard
For artboards that are similar ratios, this resizing can be as simple as making the entire selection bigger to fill up the art board, like so:

This will be slightly trickier for skyscraper or banner ads. You’ll have to be creative about how the elements fit together, which is why having a layered image file is so important for designers who are building out additional sizes.
Step 5: Repeat step 3 & step 4 for all the other artboards
This part is simple, but can sometimes feel like you’re playing Tetris with your content. When you’ve filled out all the artboards, your template should look like this:

You’re almost done!
Step 6: Export your ads as flat files for uploading
You’ll need to select all your artboards to export your files. You can either click on the names of each within your photoshop workspace, or you can collapse your layers back into their artboard folders and select them all there.
Then, right click on the selected artboards within the layers tab and select “Export As…”

It will bring you to a screen like this, where you can adjust the image quality and file type for each size before saving them out. Remember, AdWords only accepts files that are 150kb or smaller!

When you click the “Export All” button on this menu, it will let you select a place to save your new files. I would recommend making a new folder to save out your images. Once you click the final “Export,” it will save all your artboards, named according to their dimensions and ready to be uploaded to your campaigns!

You did it! With this template, it’s easy to create and export all the ad sizes you need for your AdWords display campaigns. Of course, now that you’ve got your ads put together, you’ll need to get the most out of them, but that’s a topic for a different blog post (check out this post to get started!).
Questions about our template? Recommendations on how to make it better? We want to hear it—please leave a comment below!
The post How to Use Disruptive’s AdWords Display Ads Template appeared first on Disruptive Advertising.