Web scraping, sometimes called data scraping, data extraction, or web harvesting is merely the process of collecting data from websites and storing it on your local database or spreadsheets.
For the uninitiated, web scraping may sound like one of these scary tech buzzwords, but it’s not that big a deal, technically speaking. To do any web scraping though, you need the right tools. Web scraping tools come in handy not only for recruitment purposes but also for marketing, finance, e-commerce and many other industries.
The tools we are going to examine are import.io, webscraper.io and data-miner.io.
Before we move any further, I can hear you asking “Why should I spend my precious time to learn how to web scrape”? This is why –
Why Learn Web Scraping?
Lead Generation
Leads can be either direct customers or influencers who will help you represent your brand. You can search for leads by yourself, looking through websites and social media.
But all this research takes time. So what if you could leave this research to the machines while you were focusing on more on strategic and vital tasks?
Web scraping is the cutting-edge technology that is aimed to gather your leads’ contact information from millions of web pages within the shortest time.
Customer knowledge
This is an information age, and a lot of buyers base their judgment on online reviews. So, it is very important to find out what people say about your brand, your products, your services, and those of your competitors. Web scraping tools can help you gather all this data and help you know how to improve.
Price Comparison & Optimization
Aka spying on your competitors.
Usually, the biggest challenge for a small business is how to increase the prices without losing clients. However, without raising prices, it will be impossible to get more profit.
This is where you can use web scraping tools to increase profit:
– keep you informed of any competitors price changes to quickly react and optimize your prices.
– track the success of promotions and campaigns made by your competitors to know what works best.
Web Scraping Tools
| Tool | Cost | Interface | Usage | Competitive Advantage |
| import.io | Paid (with free trial) | SUPER user-friendly | Online App | Live Dashboard |
| webscraper.io | Free | Familiar with sitemaps and Inspector | Browser Based | Sitemap (import-export) |
| data-miner.io | Free | User-friendly | Online App |
Ready-made recipes |
Import.Io
First on our web scraping tools list is Import.io.
Import.io is an enterprise-ready platform that extracts and transforms data. With Import.io you can first extract the data you need, wrangle the data to the format you want and gain insight through data visualisation. This tool allows people to convert unstructured web data into a structured format for use in Machine Learning, Artificial Intelligence, Retail Price Monitoring, Store Locators as well as academic and other research.
So how does web scraping work with this tool?
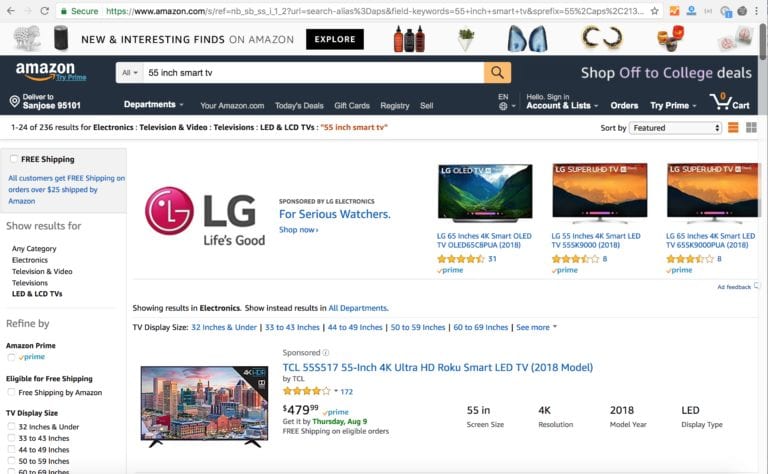
Step 1: First, find the page where your data is located. For instance, a product page on Amazon.com.
Step 2: Copy and paste the URL from that page into Import.io, to create an extractor that will attempt to get the right data.
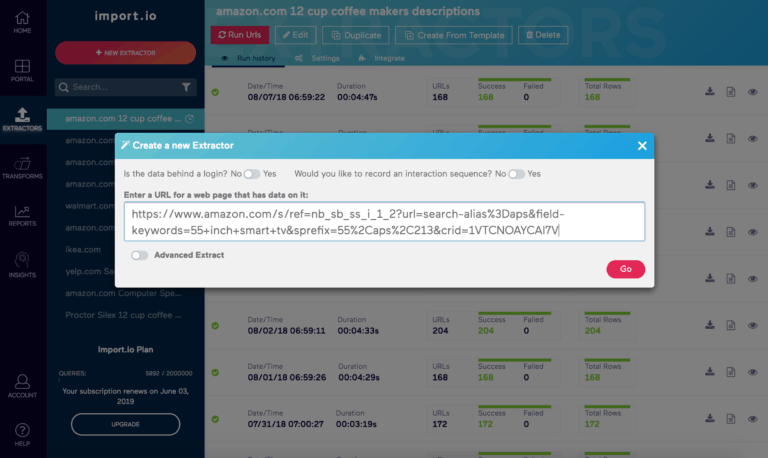
Step 3: Click Go and Import.io will query the page. It will use machine learning to try to determine what data you want.
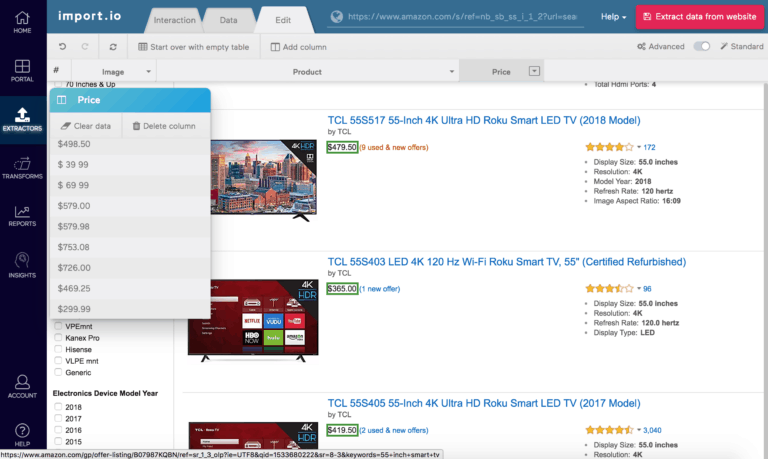
Step 4: Once it’s done, you can decide if the extracted data is what you need. In this case, we want to extract the images as well as the product names and prices into columns. We trained the extractor by clicking on the top three items in each column, which then outlines all items belonging to that column in green.
Step 5: Import.io then populates the rest of the column for the product names and prices.

Step 6: Next, click on ‘Extract data from the website’.

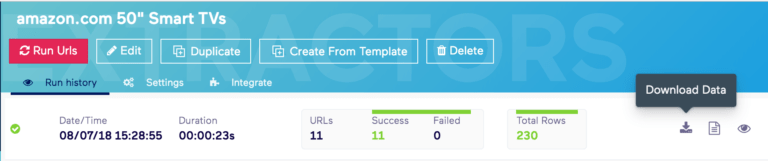
Step 7: Import.io has detected that the product listing data spans more than one page, so you can add as many pages as needed to ensure that you get every product in this category into your spreadsheet.

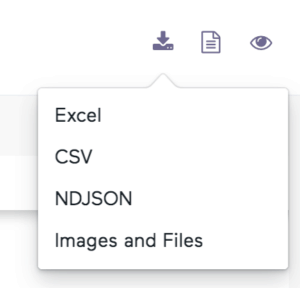
Step 8: Now, you can download the images, product names, and prices.
Step 9: First, download the product name and price into an Excel spreadsheet.
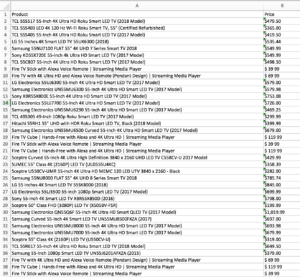
Step 10: Next, download the images as files and you are ready to put them to good use!
What else can you do with Import.Io?
What we just examined was hot to transform a basic list page of data into a spreadsheet.
There’s much more you can do, such as:
- Link a listing page to data contained on the detail pages for each product.
- Schedule a ‘change report’ to run daily to track when prices change, or items are removed or added to the category.
- Compare product prices on Amazon to other online retailers, such as Walmart, Target, etc.
- Visualise the data in charts and graphs using Import.io Insights.
- Feed this data into your internal processes or analysis tools via the Import.io APIs.
Webscraper.io
Using webscrape.io extension, you can create a plan (sitemap) about how a website should be inspected and what should be extracted. Using these sitemaps, Web Scraper will navigate the site accordingly and extract all data. Scraped data later can be exported as CSV.
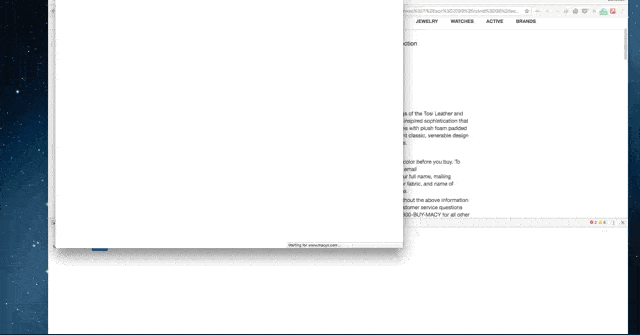
In the demo below we will scrape the data from Macy’s website and export the data to a CSV file. We will concentrate on how to get product detail information from their Home category.
Let’s get started!
Step 1: You’ll need to download the Chrome browser if you don’t already have it along with WebScraper.io, which is a Chrome extension. After downloading the extension, you should see a spider web icon on the right side of the browser toolbar. If it isn’t there then, try restarting your browser.

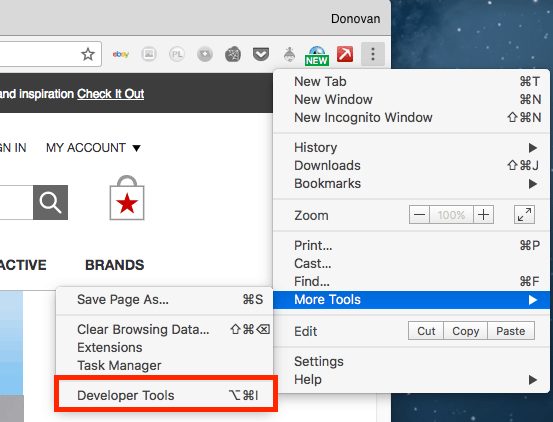
Step 2: Select the hamburger menu at the far right side of your toolbar, go to “More Tools” and then select “Developer Tools”. This will open up a developer tools window at the bottom of the browser.
Step 3: Select “Web Scraper” from the developer tools and then select “Create new sitemap” from the options. The sitemap is the blueprint for how you want the scraper to navigate through the website and obtain the data you want. Give your sitemap a name along with the URL where you want the scraper to start.
For our Macy’s example, we will be starting at the Homepage. Also, make sure to go to the page in the browser. Since this tool works in the browser, we navigate through the site while setting up our sitemap.

Step 4: After setting up the initial starting point, you’ll be able to add the first selector. A selector is essentially what you want the web scraper to do next. This is where we will tell the web scraper to navigate from the Macy’s Homepage to their Home category where we’ll look to get product detail data from their home goods section. Make sure that you’re inside the root selector and select the add new selector button.
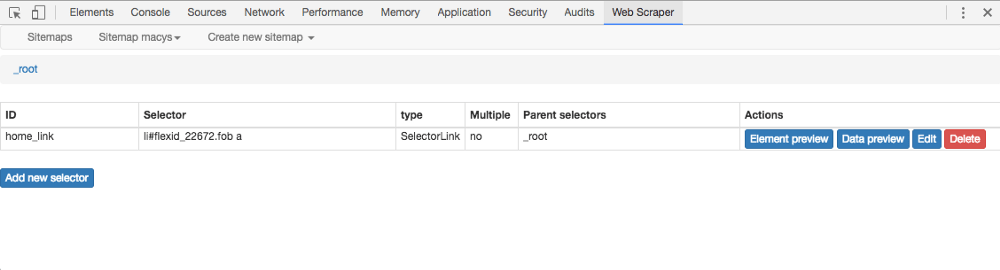
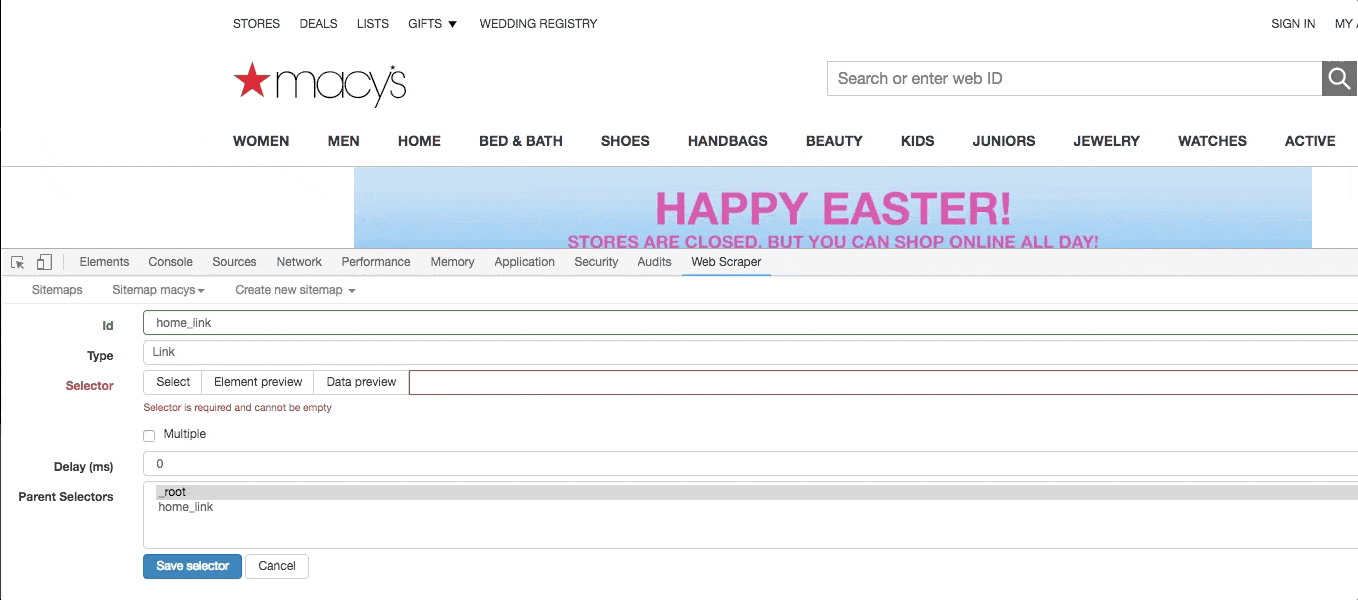
Step 5: This step is about setting up the Home link selector. We want the scraper to select the Home category from Macy’s Homepage so we can then enter the home goods section of the website. The type of selector will be a link since selecting this button will link us to that section of the site. We give the selector an ID and choose the type of the Type field.In our case, this will be a Link type.
What we do then is click the Select button, which brings the Element preview, which is a toolbar that will obtain the information (link and the href attribute of the link) of the element you are selecting on the page. If you select “Enable key events” on the toolbar, you’ll see an “S”, “P”, and “C”. If you hold down S on your keyboard while hovering over the area you want to select, it’ll get the information needed from that link. Here, we will hover over the Home category button, which gets the element’s info and places it in the Element preview.
Then select the “Done selecting!” button, which will take that element info and place it in the Selector field of your selector creation window. Then save the selector.
Step 6: Next, we have to create a selector for the subcategories of the Home category. This selector will allow the scraper to get the product detail from each subcategory as it iterates over each one. Similar to the last step, this will be creating a link selector, but this will be for multiple links. In our sitemap be sure to select the previous selector, “home_link”.
We do this because it is a hierarchical setup in which we navigate the site so this new selector will be a child of the previous one. Once we’re inside of “home_link” we add a new selector. In the browser navigate to the Home category, and you should see on the left side of the page subcategories under “Home Categories”.
Fill out the ID field (I call it home_categories_links) and the Type field as Link. Select “Multiple” underneath the Selector field and then enable key events in the Element preview. Then hold S on your keyboard and start selecting the links under Home Categories.
After you select two of the links, the scraper is smart enough to detect the pattern and select the rest of the links that have common element information for every link. This way when the scraper is navigating the site, it’ll know it has to go through all of those subcategories and get product info. Be sure that the element’s info is in the Selector field and then save the selector.
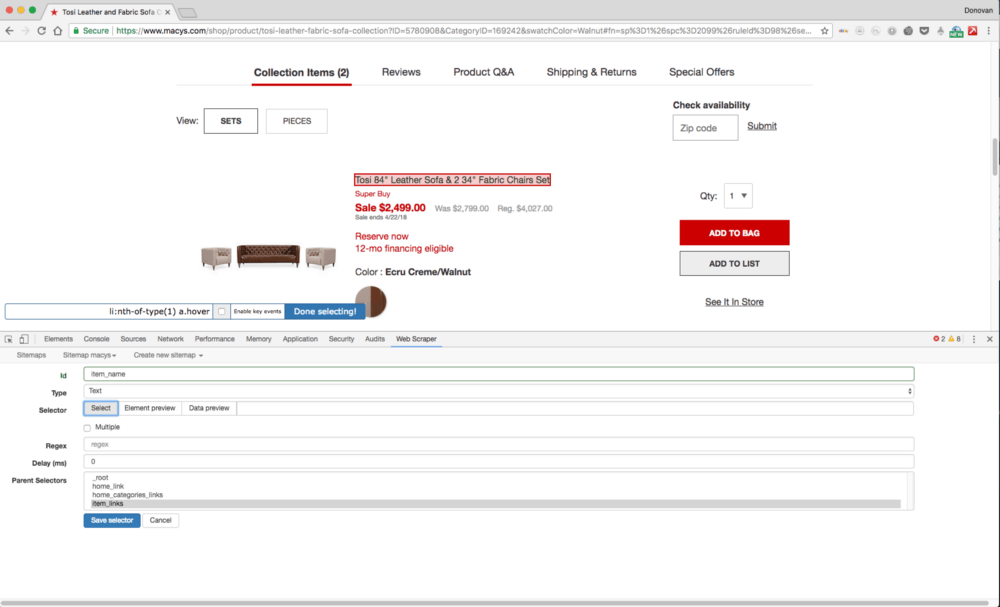
Step 7: Select the product links under the subcategories. To get a product’s details, we need the scraper to select the product from each subcategory. Once again similar, to the last step, let’s make sure we are now inside of our previous selector “home_categories_links” and then add a new selector. In the browser, select one of the subcategories, so we are on that page.
Give the selector a name (I called it “item_links”). We will be selecting multiple links again. So set up the selector in the same way as the previous step. In this case, you can either link to choose the product’s title or the image since both links to the product detail page.
I choose to select the image. Once you start to select multiple product images while holding down the S on your keyboard, you’ll notice that similarly to the previous step, all of the image boxes will be selected and the common element info will be in the element preview toolbar. Verify that this info is in the Selector field and save that selector.
Note: A quick recap of what the parent/child relationship of our sitemap graph would look like at this point:

Step 8: Select the product detail information you want. Make sure you’re inside the “home_categories_links” selector and create a new selector. In the browser select one of the products from the subcategory so that you‘re on that product’s detail page. We are going to get a product’s name, price, colour and image, which will be a URL to the image.
We will create four selectors for these, which will all be children of the “home_categories_links” selector. So add a new selector for the product name and give it an ID (I called it “item_name”). The selector type will be Text.
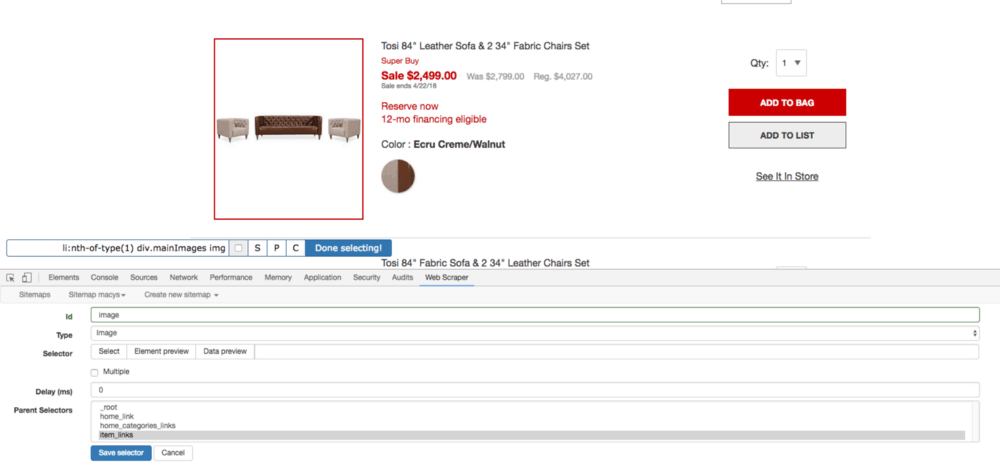
Bring up the Element preview and select the text of the item’s name to obtain the element info and then save this selector. The same steps will apply for the price, colour and image selectors. Regarding the image, the only difference will be the selector’s type, which will be Image instead of Text.
Step 9: Verify your sitemap navigation. You can view your sitemap’s parent/child relationship by selecting the sitemap’s drop-down and then selecting “Selector Graph”.
Step 10: Scrape dat_data! To start scraping select “Scrape ” under the sitemap’s drop-down. This will take you to a screen that allows you to adjust the request interval and page load delay times in milliseconds. The default is 2000, but in the case of Macys, I noticed that it had to be increased to 3000, to allow the product detail page to fully load in time before trying to get the information from the page. Once you select “Start Scraping”, a secondary browser will launch that allows you to observe the scraping in progress.
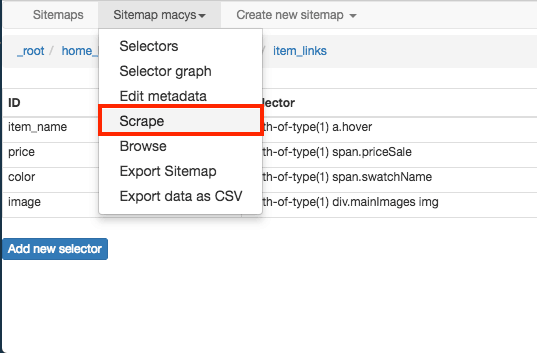
Step 11: Export as CSV. While the website scraping is in progress, you can refresh to show the data collected so far. After the scraping is finished, you can then export the data into a CSV, which is located under the sitemap dropdown, and then you’re done!


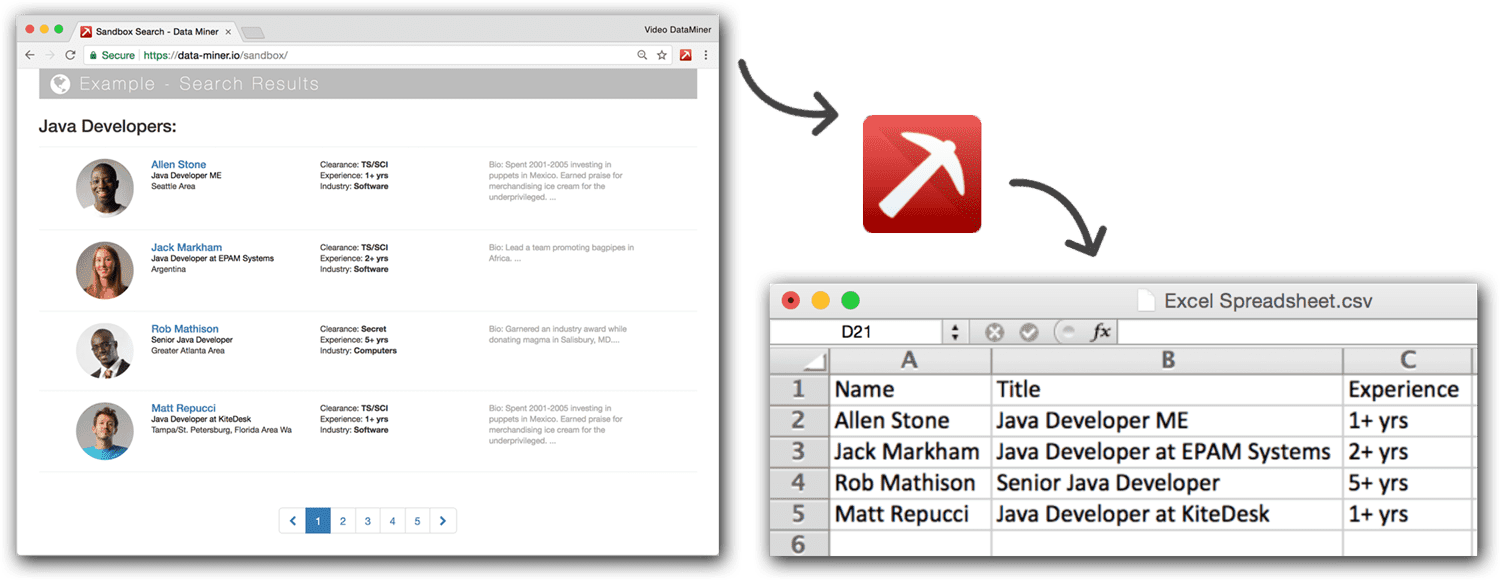
Data Miner
Date Miner is our second web scraping tool for today. It is is a chrome extension software that assists you in extracting data that you see in your browser and saves it into an Excel spreadsheet file.

Data Miner is a personal browser extension that helps you transform HTML data in your browser window into a clean table format.
When using Data Miner, the data you scrape is always private. Your data or your credentials never leave your browser and never touch Data Miner’s server. Only you have access to the data you scrape whether you have the tool.
Data miner features a function called ‘recipes’. Recipes are data extraction instructions that Data Miner uses to extract data from websites. Recipes contain name and position of HTML elements on a web page. Recipes do not include actual data or private information about you.
When you visit a website, Data Miner automatically filters thousands of recipes that users have created and shared and shows only the ones that are appropriate for the site you are currently viewing.
How to use Recipe Creator:
Step 1: Visit the site you want, launch Recipe Creator and pick your page type.
Step 2: List pages require rows and have multiple pages while detail pages only have one page and only need columns.
Step 3: Starting with a list page, hover your mouse over the data until a highlighted box encloses all the information you are looking to scrape.
Step 4: Once the Row is highlighted, press shift, then on the tool select one of the suggest classes to lock in the selection.
Step 5: You can now start selecting your individual data. Click on the Column tab and select “col1”.
Step 6: Give the column a name, hover over the data you wish to extract in this column and press Shift.
Step 7: Pick the class that highlights the data the best. (Helpful tip – use the Up Parent button for more options if the data isn’t selected correctly).
Step 8: Once the data is highlighted correctly, click on the class name confirm it and click Data double check your work.
Step 9: Continue creating by clicking “+ Column”.
Step 10: Once you have all columns, finish by clicking the Save tab at the top. Give the recipe a name and click Wave.
Step 11: Recipes will save over each other unless you start a new recipe. Start a new recipe by clicking the new recipe button on the save tab.
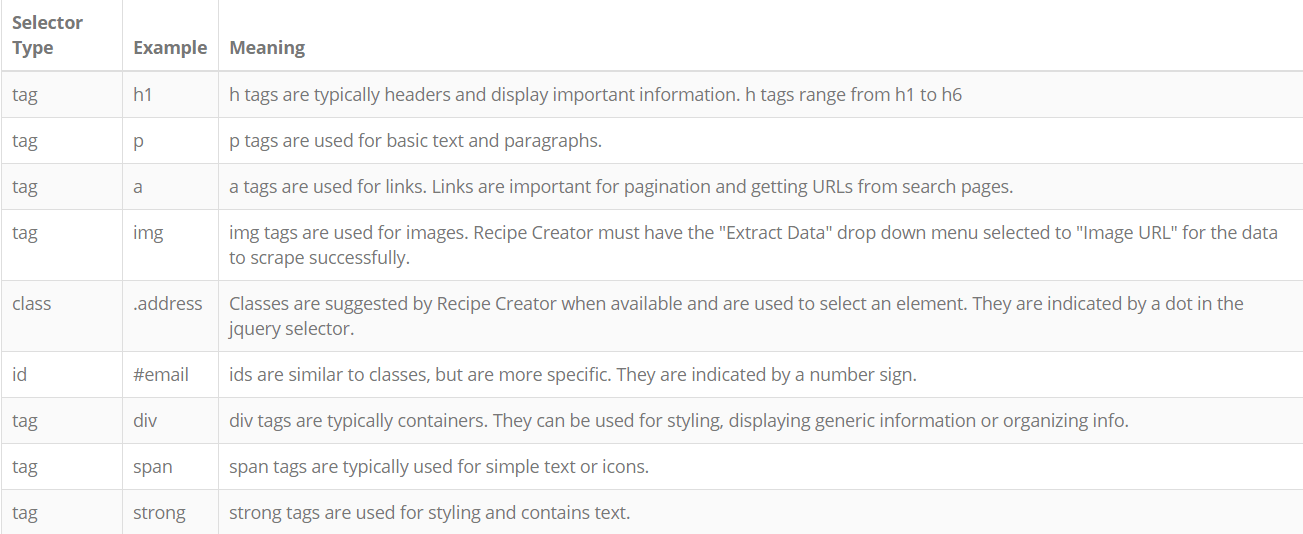
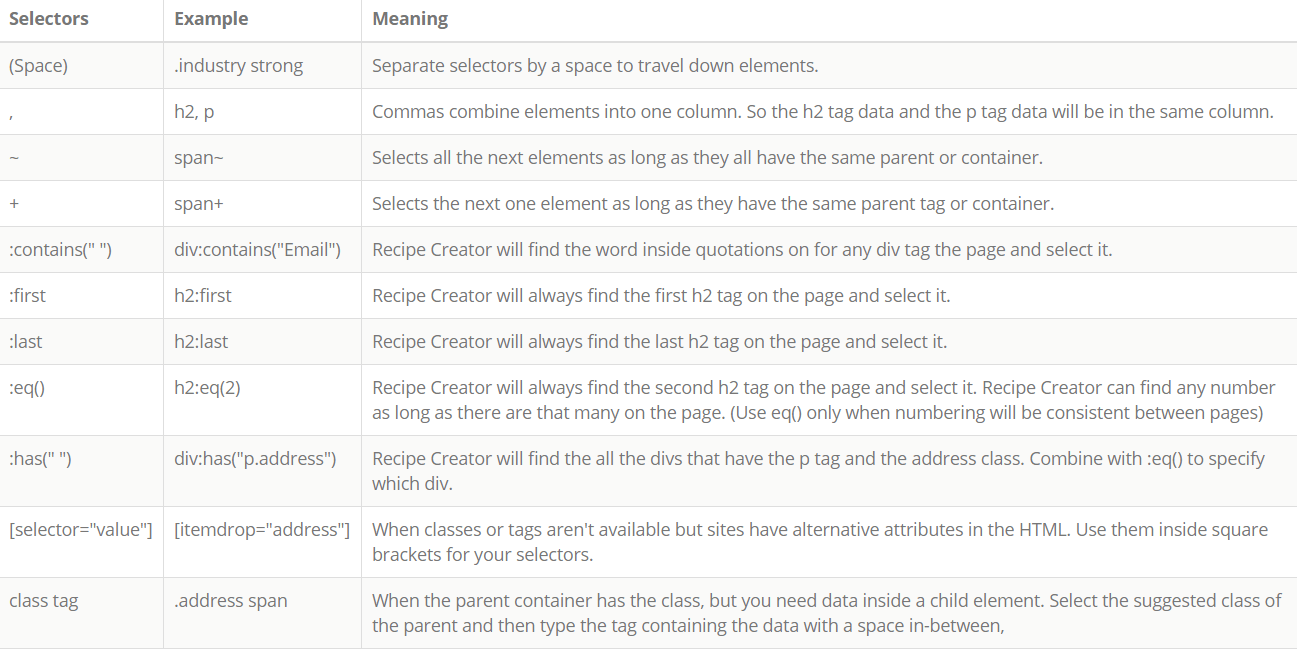
Recipe Creator Selector Tricks and Tips
Basic Selectors
Advanced Selectors and Selector Combos
Before you go
There are many web scraping tools to choose from. I encourage you to research which tool or service to use based on your needs and budget.
To sum up, web scraping can be used in any sphere of business: e-commerce, education, healthcare, real estate, research, marketing, etc. Thanks to web scraping you can:
– generate new leads
– find new ways to step forward among competitors
– increase your profits
– finding reliable partners
If you use any other web scraping tools, please let me know in the comments. I’d love to hear them!
Also, feel free to check other free tools we share and tools we write about.
Bye bye – for now!
The post Tutorial: The 3 Best Web Scraping Tools – From $0 appeared first on GrowthRocks.


